Chapter 8: Miscellaneous Features
Contents
8.1 CMYK-to-RGB Conversion
Most digital images we deal with are RGB. That is, the color of each pixel in those images is represented by three components -- red, green and blue (RGB), which correspond to the three cathode emitters in the monitor. In images intended for print, on the other hand, the pixels are represented by four colorants -- cyan, magenta, yellow and black (CMYK), which correspond to the four primary ink colors used in printers.
JPEG and TIFF images created in the CMYK color space cannot be viewed over the Web, Internet Explorer shows them as the "red X" icon. To enable CMYK image viewing, AspJpeg 1.5+ offers a new method, ToRGB, which converts CMYK images to the RGB color space.
Converting CMYK to RGB is not a trivial task and there is no single "correct" way to do it. To achieve reasonably good color reproduction, the ToRGB method performs a series of complex non-linear color transformations based on profiles, the standard color space definitions established by the International Color Consortium (ICC). For more information on ICC profiles, visit www.color.org.
CMYK-to-RGB conversion is a very CPU-intensive procedure. It is therefore important to call the ToRGB method after the image size has been reduced:
Jpeg.Width = Jpeg.OriginalWidth / 2
Jpeg.Height = Jpeg.OriginalHeight / 2
Jpeg.ToRGB
' Slow
Jpeg.ToRGB
Jpeg.Width = Jpeg.OriginalWidth / 2
Jpeg.Height = Jpeg.OriginalHeight / 2
Jpeg.ToRGB only has effect if the current image is in CMYK or grayscale color spaces. If the image is already an RGB one, the method does nothing.
To see the CMYK-to-RGB functionality in action, run Live Demo #3.
8.2 Image Resolution
Image resolution is information embedded in an image specifying the print quality of this image should it be printed. Resolution is usually expressed in dots-per-inch (DPI). 72 DPI or 96 DPI images are known as low-resolution and 300 DPI and above as high-resolution.
Most image viewers, such as your Web browser, ignore the resolution information and simply use the pixel size of the image for screen rendering. Advanced image management and print systems such as Photoshop do use image resolution to compute the correct size of the image on paper when printed. Note that resolution information is not always embedded in an image. If that is the case, it should be assumed to be 72 DPI.
AspJpeg 1.5+ enables you to retrieve the resolution information from images, and also set new resolution. The properties OriginalResolutionX and OriginalResolutionY return the current DPI resolution along the horizontal and vertical coordinates, respectively. If these properties each return 1, it means the resolution is not embedded in the image. Quite possibly, however, this information is still present, but in the form of EXIF tags (read more about EXIF in the previous chapter.)
The following code snippet attempts to retrieve the X and Y resolutions from an arbitrary image:
path = "c:\path\image.jpg"
jpeg.Open(path)
XRes = jpeg.OriginalResolutionX
YRes = jpeg.OriginalResolutionY
If XRes = 1 and YRes = 1 Then
' Look among EXIF tags
Set Info = jpeg.OpenInfo(path)
If Info("XResolution") <> "" Then
XRes = Info("XResolution")
YRes = Info("YResolution")
Else
Response.Write "Resolution info not found."
End if
End If
%>
To set new resolution, use the properties ResolutionX and ResolutionY, as follows:
Jpeg.ResolutionX = 72
Jpeg.ResolutionY = 72
...
Jpeg.Save path
8.3 Access to Individual Pixels
Starting with Version 1.5, AspJpeg is capable of setting and retrieving individual pixels of an image via the default Pixels property of the main ASPJpeg object. This property accepts two arguments (X, Y) which specify the location of the pixel to be set or retrieved. The property returns, or is assigned, an array of color components for this pixel. In case of an RGB image, the array must contain exactly three elements. The number of color components in an image can be retrieved via the property Jpeg.OriginalComponents.
Since Pixels is the default property, it can be omitted. The following code snippets demonstrate this technique:
jpeg.Pixels(20, 50) = array(0, 255, 0)
' Retrieve pixel (30, 40). The word "Pixels" is optional
arr = jpeg(30, 40)
for i = 0 to jpeg.OriginalComponents - 1
Response.Write arr(i) & " "
Next
Object [] arr = new Object[3];
arr[0] = (Object)255;
arr[1] = (Object)128;
arr[2] = (Object)0;
objJpeg[20, 30] = arr;
// Retrieve pixel (15, 20)
Array arr2 = (Array)objJpeg[15, 20];
for( int i = 0; i < objJpeg.OriginalComponents; i++ )
Response.Write( arr2.GetValue(i).ToString() + " " );
8.4 Progressive JPEGs
A progressive JPEG is an equivalent of "interlaced" GIF. Such an image can be displayed in full size even if only partially downloaded, although in lower quality. As more and more data arrives, the image progressively becomes sharper and sharper until the entire image has been downloaded. This feature makes progressive images attractive in a slow-connection environment.
With AspJpeg 1.5+, you can create progressive JPEGs by setting the Progressive property to True:
...
Jpeg.Save path
Note that Netscape is currently the only major browser supporting gradual rendering of progressive JPEGs, other browsers just display the entire image at once after it has been fully downloaded.
8.5 Brightness, Contrast and Saturation
Starting with version 1.7, AspJpeg is capable of adjusting the brightness, contrast and saturation of an image using the multi-purpose Adjust method. This method expects two parameters: the operation code and the operation-specific value.
To adjust brightness, 1 is passed as the first parameter and a brightness value in the range [-1, 1] is passed as the 2nd parameter. A value greater than 0 increases brightness, a value less than 0 decreases it:
To adjust contrast, 2 is passed as the first parameter and a contrast value in the range [0.001, 5] is passed as the 2nd parameter. A value greater than 1 increases constrast, a value less than 1 decreases it:
To adjust saturation, 3 is passed as the first parameter and a saturation value in the range [-1, 1] is passed as the 2nd parameter. A value greater than 0 increases saturation, a value less than 0 decreases it:
The Adjust method is only applicable to RGB images.
NOTE: As of Version 2.6, the Adjust method is obsolete. ApplyFilter, a more versatile method described in the following section, should be used instead.
8.6 Filters
As of Version 2.6, AspJpeg offers several common image filters such as brightness, contrast, saturation, blur, sharpness, edge detection and others via a single method, ApplyFilter. This method accepts three arguments: the Filter ID, and two filter-specific parameters. The first parameter is a number, the 2nd is an optional variant value. Some filters require the 1st or 2nd parameter only, others require both, still others none at all.

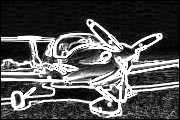
The following table summarizes all filters currently supported, as applied to the image shown above.


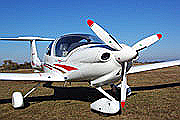
Usage: Jpeg.ApplyFilter 6, 0, Array(-2, -1, 0, -1, 1, 1, 0, 1, 2)
Sharpen, blur, emboss and many other filters are based on a generic convolution transformation. The kernel in this example implements an emboss filter.
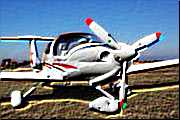
Usage: Jpeg.ApplyFilter 7, 150
Converts the image to monochrome (strictly black and white.)

Usage: Jpeg.ApplyFilter 8, 0
Implements Sobel edge detection algorithm. Converts the image to grayscale.
Usage: Jpeg.ApplyFilter 25, 5, Array(50, 155)
Replaces the green or blue pixels of the image with an alpha channel. Introduced in Version 2.9.0.4. For more info see the following section of the manual.
Note: the ApplyFilter method cannot be used with CMYK images.
8.7 Chroma Key
Chroma Key refers to a visual effect where two images are combined into one in such a way that the monochromatic (usually green or blue) background of the first image is replaced with the second image, while its foreground subject remains intact. It is commonly used for weather forecast broadcasts, among other areas.
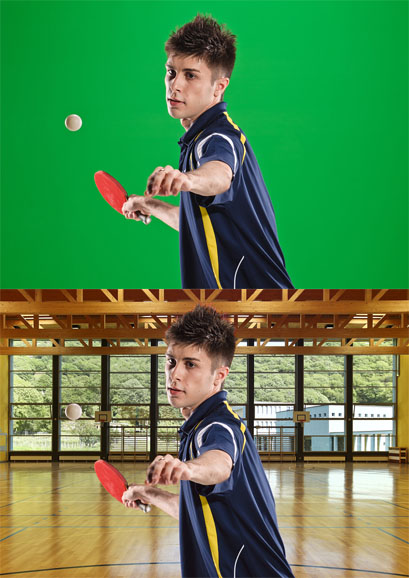
As of Version 2.6, AspJpeg implements the chroma key effect via the method DrawImageChromaKey of its Canvas object. This method is similar to the DrawImage method in that it draws one image on top of another, but it does so while removing the monochromatic background of the image being drawn.
The DrawImageChromaKey method expects 8 arguments. The first three are the same as in DrawImage: the X and Y coordinates and an instance of the AspJpeg object representing the image to be drawn on the current image. The other 5 arguments control the handling of the monochromatic background of the image being drawn: the RGB values of the key color (the predominant color of the background), and two color distances Dist1 and Dist2. All pixels with the colors closer to the key color than Dist1 are made fully transparent. All pixels with the colors farther from the key color than Dist2 are made fully opaque. All pixels in between are made semi-transparent for better blending. All these arguments are to be chosen by trial and error for each background.
The image above was created using the following code sample:
Set BG = Server.CreateObject("Persits.Jpeg")
' Open background image
BG.Open Server.MapPath(".") & "/../images/gym.jpg"
' Open image with subject against monochromatic background
Set Jpeg = Server.CreateObject("Persits.Jpeg")
Jpeg.Open Server.MapPath(".") & "/../images/greenscreen.jpg"
' Draw it on the background. Remove "green screen".
' Key color's RGB values: (60, 205, 72)
' Color distances: 20, 80
BG.Canvas.DrawImageChromaKey 0, 0, Jpeg, 60, 205, 72, 20, 80
BG.Save Server.MapPath("chroma.jpg")
%>
String strBGPath = Server.MapPath("../images/gym.jpg");
String strPath = Server.MapPath("../images/greenscreen.jpg");
IASPJpeg objBG = new ASPJpeg();
// Open background image
objBG.Open( strBGPath );
// Open image with subject against monochromatic background
IASPJpeg objJpeg = new ASPJpeg();
objJpeg.Open( strPath );
// Draw it on the background. Remove "green screen".
// Key color's RGB values: (60, 205, 72)
// Color distances: 20, 80
objBG.Canvas.DrawImageChromaKey( 0, 0, (ASPJpeg)objJpeg, 60, 205, 72, 20, 80 );
objBG.Save( Server.MapPath("chroma.jpg") );
FramedImage.Src = "chroma.jpg";
Click the links below to run this code sample:

As of Version 2.9.0.4, there is an alternative, more flexible, method to handle chroma key. This feature is implemented in the form of a filter (described in the previous section) and invoked via the method ApplyFilter with the first argument set to 25.
When this method is called on an image, its green (or blue) pixels are transformed into an alpha channel. The green background becomes fully transparent, while antialiasing (semi-transparency) is applied to borderline pixels. The image can then be saved in PNG format, or drawn on any background. For more information about alpha channels and PNG format, see Chapter 10.
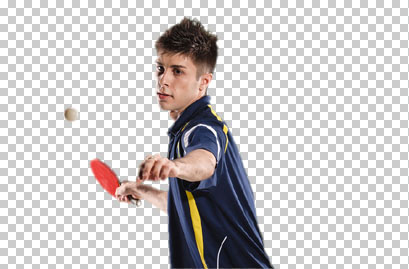
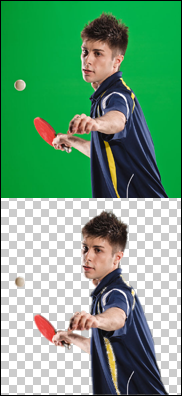
The 2nd argument to ApplyFilter specifies the antialiasing radius, a number between 1 and 10, and the 3rd argument is set to an array of two numbers specifying the hue range to be turned into an alpha channel. The default values are (50, 155) which is a range of green hues.
The following script turns the image above to a PNG image with an alpha channel. The checkered background on the picture below designates transparent areas.
path = "c:\path\image.jpg"
jpeg.Open(path)
jpeg.ApplyFilter 25, 5, Array(50, 155)
jpeg.PNGOutput = true
jpeg.Save Server.MapPath("greenscreen.png")
%>